Thursday, October 29, 2015

Kaleidoscope Quilt Block Assembly


To begin the block assembly process for the kaleidoscope quilt, I actually laid out the triangles that form the 56 octagons. The intent is to alternate between light and dark or light and medium colors, and I wanted to be sure I had enough of the different combinations to work out. I ended up pairing some dark and medium triangles together, too.

I then sewed together pairs of triangles. In the photograph below, you can see the stacks of triangles - some pinned, ready to be sewn together and some stitched and pressed. I ironed the triangle pair such that the seam folded onto the darker fabric.


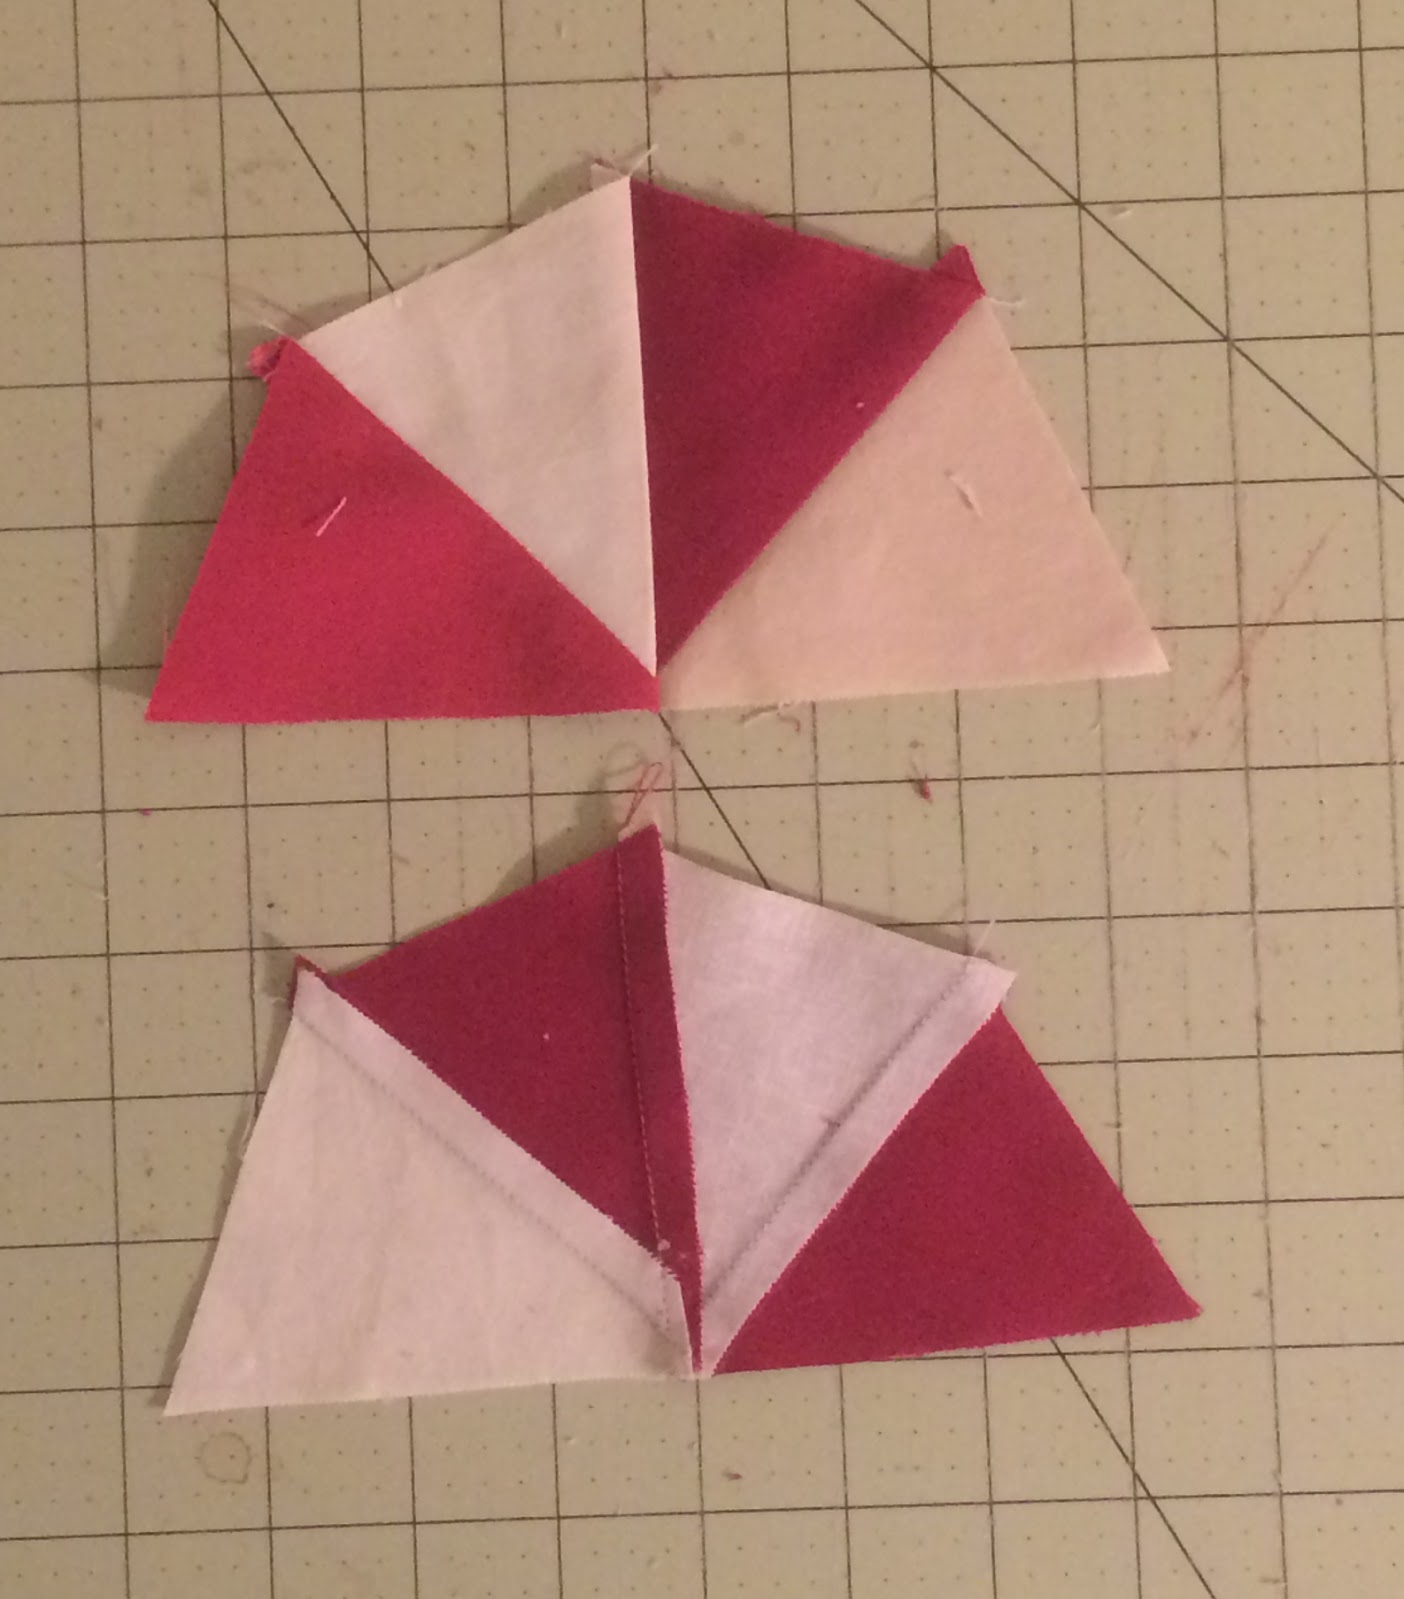
Next, I formed half of the octagon by sewing the pairs from above together. The picture below shows the front and back of the pieces. You can see that the center seam has to be ironed toward the lighter fabric.


At this point, I did not trim anything (see the overhanging seams in the pictures above?). The full octagon was formed by stitching the two halves together. The seam allowance was pressed entirely to one side.

One thing I have not worked out about this block is how to avoid having a thick knob of fabrics in the center of the block. This is where 8 pieces of fabric come together. I tried splitting the seam allowance after sewing together the two halves (half the seam allowance goes to each side). But, the fabric would not press flat.


Sunday, October 25, 2015

Kaleidoscope Quilt - Cutting


The kaleidoscope  quilt (eo-1) was my first project with the fabric. The pattern I have divides fabric into three shades: light, medium, and dark. Each block is composed of eight large triangles and four corner triangles. Half of the large triangles are dark or medium. The other half are light or medium.

A block looks like:


The intended block-size is 6" square. The quilt will have 56 blocks arranged in an 8x7 grid, with no border. The corner triangles on the perimeter of the quilt will be dark.

To prepare for this, I will need:

               149 dark triangles for octagon
               150  medium triangles for octagon
               149 light triangles for octagon

Cut strips 3 15/16"  x fabric width. The template has a base width of 2 5/16". I used an acrylic triangle template to divide up fabric strips.

I will also need:

          52 dark corner triangles
          172 medium and light corner triangles

Cut strips 2 5/8" x fabric width. The corner triangle dimension has two short sides of 2 5/8". I used an acrylic template to divide up fabric strips.


Wednesday, October 21, 2015

Seven Quilts - Yardage


The question today is: can seven quilts be made with ~17 yards of fabric?

I want to make smaller quilts - crib-size. My sewing area is small, and I am not really set up to do the quilting on a large quilt with my sewing machine.

A baby quilt is usually somewhere from 42" to 60" on a side. To just cover the surface of something 42" x 60", you would need at least 2.5 yards of fabric.

So, for the 7 quilts, the sizes will have to be smaller than this - or I have to include the use of a white or other neutral 'background' fabric. I am actually going to use both of these strategies.

I have plans for four of the quilts using traditional designs:

eo-1: Kaleidoscope
eo-2: Ladders to the Stars
eo-3: Star of Bethlehem
eo-4: Irish Chain

These quilts are all similar in size - but use varying amounts of the seventeen colors. The Irish Chain is mostly background fabric.

I purchased a stone gray Kona cotton and white Kona cotton for background fabric. The gray will also be used for binding.

For the quilt backing, I bought some wide (144") fabric in a muted red hue.

The remaining three quilts, I hope, will be more original designs. I tried to plan all 7 quilts in advance, but kept hitting a wall with these. I have been struggling with both a lack of confidence in my skills and a lack of experience with quilt design. I thought I would make the first three quilts, and then take a break to design the last three. I will probably make the Irish chain quilt with scraps at the very end.

Saturday, October 17, 2015

Ordering fabric by gray-scale


The final fabric preparation step was to order the fabric from light to dark by using a gray-scale conversion. To do this, I set each folded cut outside on a sunny day. I tried to order the fabric from light to dark. Then, I took a photo. I converted the photo to gray-scale and made adjustments until the fabric was more or less in order. Below are two of the photos from this process when I was getting close to having the fabric in order.


Getting the fabric in order by tone is important for block lay-out. In general, I will go by dark, medium and light tones. I keep track of which fabric is which by stapling a number in the selvage and I recorded the tone (dark/medium/light) for each number in my notebook.

Tuesday, October 13, 2015

Colors


The colors for this project were chosen based upon a Thanksgiving my husband, son and I spent in Spray, Oregon. The autumn colors dominated the landscape – and, while the bulk of the land was very dry with glowing pale yellow stalks of grass and muted green sagebrush in the fields, the banks of the John Day River were demarked by wine-red willow branches. The dark gray slate and black burned areas showed up periodically along the road-side.  I chose seventeen colors, mostly Kona cotton. I have worked with Kona cotton fabric before and I appreciate that the fabric is a solid woven color (not printed). The weight of the fabric seems more substantial than a printed fabric. I did include a few fabrics printed to look like linen.

The colors in the study are shown below. The four swatches to the right are the linen print (a print of a linen pattern on cotton).


I ordered one yard of each material. A few of the cuts showed up with a generous yard piece (end-of-bolt).

To begin, I sewed a zig-zag stitch along each raw edge. Then, I washed the fabric. I like to wash the fabric before working with it in case the fabric shrinks or the colors run. I completed a Kona cotton quilt a few years ago with red blocks on a gray background. I did not pre-wash the red and some of the red ran onto the gray borders – leaving a permanent discoloration.


The zig-zag stitch seemed to, partially, prevent the fabric from unraveling. I still had to cut some wadded up threads from each piece before I could iron the pieces.

Friday, October 9, 2015

I Heart Oregon


When I lived on the East coast, I thought Oregon was a perpetually rainy, gray state thick with acres of fir and moss. Pretty soon after making my home in Oregon, though, I realized that the state geography is varied and beautiful and so much more.

Years later, my son developed an interest in dinosaurs. We hit the road to look for signs of prehistoric life in the center of the state. Oregon was in the ocean during the time of the dinosaurs. As the seas began to recede, the plesiosaur was one of the only large creatures to be found in the local fossil record. What Oregon does have, is the entire fossil record of mammal life in the Pacific Northwest. The John Day Fossil Monument has been preserved to give people the chance to see this landscape.

The drive from Portland to the John Day Fossil Monument takes you from rain-forest, to prairie – and ultimately to high desert. The trees diminish in size and spread out – eventually replaced by grass and sage-brush. The sky grows. In the span of a five-hour drive, you can feel the space and the clutter dissipate.

After five or six trips into central Oregon, I had decided to capture the colors in a series of seven quilts. Why quilts? Why not. Probably because I love to sew. I like to make things that have function. I like to think about color. Plus, now – two years later – I hope this project gives me a reason to head out to central Oregon a few more times.

I began this project in 2013. I picked out the fabric; it arrived and has been in a box until this summer. In the meanwhile, I have had to complete other projects and give up a year of my life to cancer. But, now I am ready. This blog will be bounded by the project.