Tuesday, October 4, 2016

Eastern Oregon Blocks Series - All 7 Quilts


The seven quilts are shown in the picture above. There was a bit of wind, so I was unable to take a photo with all seven sitting flat against the fence. I mostly wanted to show this picture to demonstrate the relative size of each quilt and the colors.

The quilt sizes are:

- kaleidoscope: 40"x 46"
- ladders to the stars: 59" x 60"
- star of Bethlehem: 43" x 43"
- sagebrush perspective: 43" x 45"
- willow: 43" x 50"
- crop circles: 34" x 46"
- which way: 42" x 56"

I have a bit of fabric left from the start - but, in general, I used the majority of the original fabric collection.

In the end, I think each quilt has its merits. I am happy to have tried so many different designs and surprised by the results. However, it does not seem possible that a person would look at any of the quilts and see Eastern Oregon.

Thursday, September 29, 2016

eo-7 Which Way - Final Quilt


The most interesting part about this quilt for me was the quilting process. I ended up trying to quilt along the diagonal for a few of the arrows - with the lines extending across the quilt. The result is a pretty nice pattern on the back of the quilt, and the top also seems to be more coherent.

The best news about this quilt is that I have successfully completed seven quilts in this series! The next post will show all seven. I need to find a clothesline!

Tuesday, September 27, 2016

eo-7 Which Way - Top Assembly

I think I wanted to just hustle through this quilt making process. I do not have many photos of the assembly.


In the end, I created a series of arrows heading toward one another. A white strips is sewn between arrow halves and between each arrow. In addition, the arrows have different lengths.


The quilt has the red fabric backing, but tan binding.

Thursday, September 22, 2016

eo-7 Which Way

The final quilt in this series is motivated by a desire to get better at working with diagonals. I wanted to make a series of arrows - much like the Feathers quilt seen here.

Instead of buying the pattern, I wanted to see if I could work out how to design and lay-out the quilt with the fabric I had on hand. This would mean that the dimensions of the arrows would need to vary.

I wanted to be organized about this and layout each color and plan the design, but really - I did not have enough fabric to do this efficiently. So, instead, I picked the angle for the arrows and tried to work out how to sew together 'strips' of  arrows with the correct offset to minimize fabric waste.


My hope was to use the same taupe color as the background for the entire quilt top. However, I did not have enough fabric for this, so I ended up adding white strips between the arrows.


Tuesday, September 20, 2016

eo-6 Crop Circles - Final Quilt

The Crop Circle quilt has the same red fabric for backing and binding as the earlier quilts in this series.

For the quilting, I used a red thread for the back and an off-white thread to trace each circle.


Thursday, September 15, 2016

eo-6 Crop Circles - Top Assembly

The top assembly process was just one of deciding on what colors go where.


Not sure about how to quilt this, though.

Tuesday, September 13, 2016

eo-6 Full Circle

Once the quarter circle blocks were assembled, I made half and the full-circles. It might have been possible to go for assembling rows or columns, but I wanted to try to achieve a series of light and dark circles. This required me to layout the full top and it was more convenient to assemble the circle blocks first.


You can see that the block alignment is not perfect, but I am still more interested in the colors than the perfection of the seams. 


Thursday, September 8, 2016

eo-6 Cutting and Block Assembly


The pieces for the quarter-circle blocks were cut using acrylic templates that my husband was willing to make for me.


To begin with, I cut 4" squares, and then marked the profile of each template on the squares. This approach seemed to speed up the cutting process.


I then assembled the blocks by just ensuring that the two pieces were different colors. One of the most helpful tools to have handy when sewing curves is a pair of blunt tweezers to help pull the final bit of the fabric around the bend as it approaches the feed dogs on the sewing machine.


Tuesday, September 6, 2016

eo-6 Crop Circles

The sixth quilt in the Eastern Oregon quilt series is essentially a sky-view of crop circles. It turns out people grow things in the high desert. Irrigation is key.

The design will be a simple 12 x 16 of 3.5" quarter circle blocks.

The starting point of the actual doing of this quilt was a fabric audit. I wanted to see what was remaining of the fabric in terms of color and yardage.


The photo above shows all of the remaining fabric. I tried to arrange everything by tone. Two of the original colors were fairly depleted, but I had more than enough fabric remaining for two final quilts.

Thursday, September 1, 2016

eo-5 Willow Quilt Complete


The fifth quilt in this series took me quite a while to work on and finish. Because this was not a traditional design, I really struggled with the worry about not making something that needed to be thrown on the burn pile immediately. The turning point was really when I just decided to treat this quilt like the others: a learning experience. Instead of just learning about a sewing technique, this time I had to stretch half a step further and come up with my own way to try to convey the beauty of the riparian area along the John Day River.

The trick to all of this is really to remind myself that, while I could do this much better now and that others could do even better, I am just learning and trying.

Tuesday, August 30, 2016

eo-5 Willow Quilt Final Assembly

The biggest challenge I am finding with paper piecing comes when it is time to quilt the top to the back. The variation in the thread grain across the block can result in something that does not sit very flat.

I suspect that a pro at paper piecing would be mindful to always cut scraps to result in pieces that have a uniform grain alignment. I will need more practice before I can do this.


I chose the same red fabric for the backing and the binding. I also pinned the quilt as densely as I could. The quilting was done with both white thread for the frame and red thread for each block.


Thursday, August 25, 2016

eo-5 Willow Quilt Top Assembly

The nine blocks came together fairly quickly. The biggest challenge was the mental gymnastics required to cut the scrap pieces correctly. While the majority of the Kona cotton used here is a solid woven color (same on front and back) - the linen pieces are stamped. This required a little more thought and was a source of mistakes and good practice.


The blocks are shown above (the blocks are sitting on a white sheet). I did not use a gradation in willow stems from top to bottom. I ended up emphasizing the background color variation. I was hoping for a desert sunset effect - with the colors clear but also almost washed out in the distance by the sun. 

After trimming the blocks, I added the white frame around each. I used a block-width section of white between the rows and a long pieces separating the columns. You can also see that I rearranged the blocks in the final layout.


Tuesday, August 23, 2016

eo-5 Willow Quilt Block Assembly


Once I had the design worked out, the block assembly process was pretty straightforward. The image below shows the newsprint design for the top, brightest, row of blocks.


I went ahead an colored in the willow branches, to remind me of the orientation of the different parts of the blocks. To assemble each block, I had to divide the blocks along the willow branches, assemble each section and then add the willow branches in as the last steps.


Above, you can see how the blocks look when sewn to the tracing paper. After completing a block, I would pull the paper off by tugging the block on each edge. This would tear the paper at the seams. 


The reverse side of one of the blocks is shown above. You can see that I am not perfect at aligning seams. However, this was not a study in perfection. I was am happy with the effect of the different background colors.


Thursday, August 18, 2016

eo-5 Willow Quilt - Design

The Willow Quilt design will be focus on the detail of willow twigs against a changing background. I want a series of nine blocks with a gradation in color - from dark to light. A foggy morning walk gave me the idea:


The density of the plant matter changes as the willow branches out. Also, the background is darker near the bottom of the image. 

I hope to create a windowpane effect, with each block surrounded by a white frame. The block size should be approximately 8.5" x 9.5" with a 6" border between each. The final quilt would then be approximately 44"x 47".

Each block will be paper pieced with a different design. I plan to draw the design on newsprint and then trace onto tracing paper. I don't plan to ever make this quilt again, so I do not want to use a CAD program to create the template. In a way, this makes the project a weird combination of art (one-of-a-kind) and craft (paint-by-number!).


Tuesday, August 16, 2016

eo-5 Learning how to paper piece

To learn how to paper piece a quilt block, I started by reading any blogs posts I could find about the topic. I also found a few patterns that I could download for free.

Some possible blogs to explore:

Sewing under the rainbow

Tartankiwi

The Tartankiwi blog has a nice tutorial series on paper piecing.

I then just tried to make a few blocks. I started by printing out the patterns on regular tracing paper that I cut to a regular 8.5" x 11" size. A typical pattern is shown below:


The pieces are added in number order. The wrong side of the fabric would face the paper.


I think the process works well for creating a flat block. I usually have problems when not sewing parallel to the fabric weave (triangles!).

I also tried some more complex patterns that I was able to find:


As the designs became more complex - I had more of a challenge keeping the blocks flat. I think it will take a lot more practice to work out how to work with paper piecing well. In the meanwhile, the design for eo-5 will have to be fairly simple.


Saturday, August 13, 2016

eo-5 Willow Quilt

The fifth quilt in the Eastern Oregon series will be based upon the riparian area along the John Day River in the autumn. The twigs and trunk of some of the bushes (willows) growing in the vicinity of the river become a vibrant red. The muted colors of the region also begin to glow as the grasses become completely desiccated and the morning temperature begins to approach freezing.


I want this quilt to focus on the willow stems and the river (rock and just the dark color of the river) and surrounding dried plant material to supply the background. The plan is to use a paper piecing approach.

This will be my first attempt at paper piecing. Paper piecing is a bit like the process of paint by numbers. Instead, small pieces of fabric are sewn to a thin (hopefully transparent) piece of paper.

The paper piecing method is well suited to using irregular shapes and sizes of fabric - often quite small pieces. The challenge is to lay out the block to make the assembly possible (i.e.laying out sections with seams that do not intersect).

I have never done any paper piecing but I really love the quilts made by Ruth McDowell. To get started, I found some freely available paper piecing designs on the internet and practiced a bit.


Thursday, February 25, 2016

eo-4 Sagebrush Perspective - Final Quilt

The final assembly step for the Sagebrush Perspective quilt is the addition of binding. I used the same gray fabric from the Star of Bethlehem quilt.


The surprises in this process are the distortion in the blocks due to the irregular angles, the lack of perspective due to the large pentagons in the top row, and relative darkness in the blocks. When I chose the colors for this series, I was going for a lot of bright and light colors. This is the lightest of the three quilts but still appears muddy. 

In a way, I wish I could complete this series and then start over with new colors.

Monday, February 22, 2016

eo-4 Sagebrush Perspective - Quilting

The quilting design for the Sagebrush Perspective quilt is pretty straightforward. First, the plan is to 'stitch in the ditch' along the seam between each row in one continuous pattern. Usually when I do this, I end up with distortion in the back fabric as the layers seem to slip slightly along the direction of stitching. However, with the white border, I did not want to have a bunch of lines in and out of the quilt at each row.

Around the border, I wanted to use a circular pattern. I found a bowl - 5" diameter - and traced it in a side-by-side pattern. The tracing was completed with a marker that will fade with time and/or heat.


After completing the quilting, I trimmed the sides.


Thursday, February 18, 2016

eo-4 Sagebrush Perspective - Pinning in Preparation for Quilting

As with the prior three quilts in this series, I used safety pins to attach the three layers of the quilt. This quilt will use a green backing fabric from an old cotton sheet.


For the pinning, I focused on the white border. For the Ladders to the Stars quilt, I did not pin to the edge - and ended up with some bunching/wrinkles in the back of the quilt. I also tried to pin in the center of the blocks.

Monday, February 15, 2016

eo-4 Sagebrush Perspective Top Assembly

To assemble the top, each row is stitched together first. Then, the rows are sewn to one another - attempting to maintain a random stagger between each. Finally, the color block is trimmed to a 30" square.


A couple of surprises from this process: first, the shadow piece ends up being a pretty tiny part of most of the squares. Second, as the blocks size shrinks, I did not do a very good job of making sure the pentagon size was reduced by an equal amount. As a result, the top blocks seems just more closely spaced.

After assembling the color block, a white border was added. The border uses a 7" strip on three sides and a 9" strip on the bottom side.


Thursday, February 11, 2016

eo-4 Sagebrush Perspective Row Assembly

The rows for eo-4 have declining block sizes. The intent is to 'randomly' align the seams - instead of squaring up the edge of each row from one edge. The first three rows are shown below.


Once the blocks for each row are sewn together, the row widths will vary. Partial blocks will exist on some edges.


Monday, February 8, 2016

eo-4 Block Assembly

To begin the block assembly, I started by cutting out pentagons in green fabric.


Next, I added the 'shadow' fabric.


Then, I proceeded to add light toned fabric around to each of the pentagon sides.


After adding pieces around the entire pentagon, then I trimmed the blocks to the intended size.


The colors in the photographs are not great - I am having trouble with the lighting in my sewing area. Hopefully I will figure out some improvements.

This process will be the same for all of the blocks. In this example, I ironed each block after adding another piece. There are few nice aspects to this block assembly approach. First, there is very little waste. You can pick small pieces and just keep adding to the block until it is large enough. Second, the final block size is something you trim to, so this avoids my utter inability to maintain an exact seam allowance!


Thursday, February 4, 2016

eo-4 Block Design

Each block of the eo-4 quilt will be designed around a pentagon (green) and a shade piece (medium-toned fabric). The block design is inspired by an activity described in Fifteen Minutes of Play by Victoria Findlay Wolfe.

The intention is not to have each block be identical - but instead to use:

  • block size in each row
  • pentagon to represent sagebrush
  • shadow piece
as the unifying factors in the quilt. I am not sure someone will really know what they are looking at, but I hope the feel of endless terrain is conveyed to some extent.

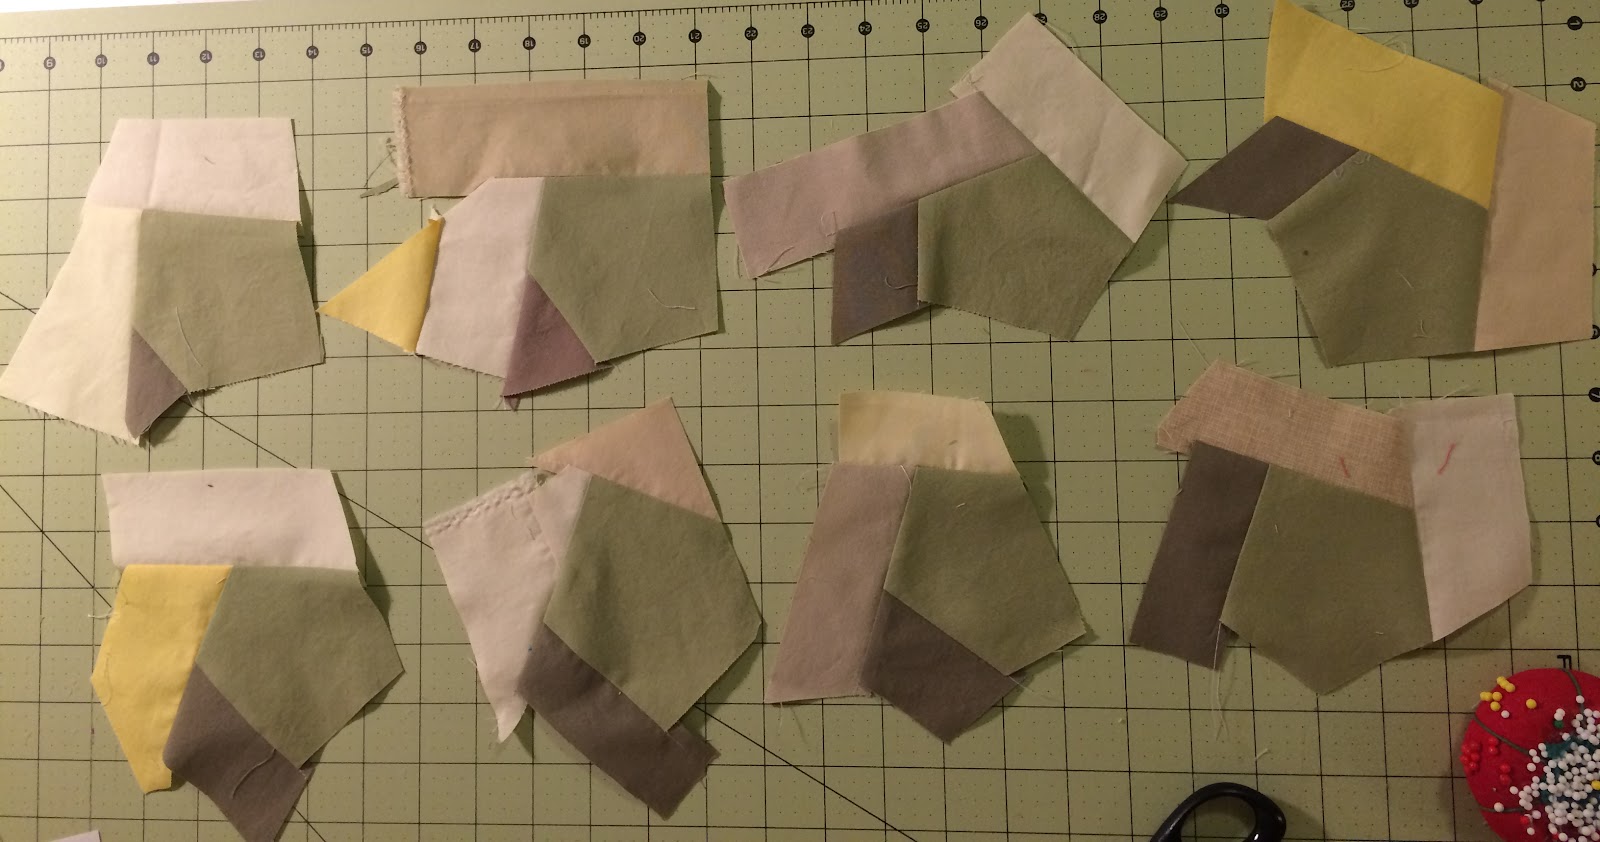
The picture below shows the assembly process for the block. The outer square shows the block with the seam allowance, the inner square is the final block. To assemble the blocks, the pentagon will be cut such that it will fit inside the final block dimension - but the pentagons will be randomly shaped (1). A medium scrap for the shadow piece will be added to one edge (2).

After adding the show block, the top edge of fabric joining pieces (1) and (2) will be trimmed, and a piece of light toned fabric will be added (3). Now, the edge between (1) and (3) is trimmed, and piece (4) is added. This process is repeated until all of the edges of the pentagon have been sewn to light-toned scraps. The final addition step will be to trim the edge of (6) and (2) - possibly also (3) - to add a final piece of fabric (7). 

At this point, the block can be squared up to match the final block dimensions (outer edge). 

For this quilt, a total of 122 blocks are required. The list below shows the list by final block dimension (when sewn into the quilt).
  • 6 x 5" blocks
  • 7 x 4.5" blocks
  • 8 x 4"
  • 9 x 3.5"
  • 10 x 3"
  • 12 x 2.5"
  • 30 x 2 " (2 rows of this block size)
  • 40 x 1.5" (2 rows of this block size)
The plan is to start with the largest blocks and work my way down. I am a little worried about using up the green fabric before I complete the quilt top. I figure I can piece together the smaller blocks out of scraps if I need to.

Wednesday, February 3, 2016

eo-4 Sagebrush perspective


The Eastern Oregon quilt series is intended to comprise of seven quilts using Kona cotton in colors inspired by Eastern Oregon in the fall. So far, I have completed three quilts using traditional designs. The fourth quilt will be a unique design - my first attempt to create an abstract representation in a quilt.

The inspiration is a desert landscape of sagebrush. I plan to add perspective in the design to show an expanse of sagebrush - as far as the eye can see...perhaps from a car window.

The sagebrush itself will be a pentagon (sage green!) surrounded by scraps of light and medium fabric. The bottom of each block will include a darker color for a 'shadow'.

I plan to have ten or eleven rows - with the final color block region spanning a 30" x 30" square. The block dimensions for each row will become smaller. The larger block will be 5", the smallest will be 1.5". Surrounding the color block will be a white frame; a border of at least 6", possibly with a wider strip along the bottom.


The back of this quilt will be green. I dyed a white sheet a pale green color. The border/binding will be gray. I am hoping for a Polaroid picture effect.


Monday, January 25, 2016

Almost Finished: First Three Quilts!

I bind quilts using the sewing machine. My process is as follows:

  1. Sew the wider half of bias tape to the back side of the quilt. Before starting, though, leave about 4" of bias tape free. To sew the tape to the back of the quilt, unfold the tape, match the bias tape edge to the quilt edge and sew a 1/4" seam allowance (even if the fold line is more than 1/4" from the edge.
  2. At the corner of the quilt, stop sewing 1/4" inch from the edge. 
  3. Extend the bias tape off the end of the quilt, then fold at a right-angle in the direction of the next edge. At the corner, there will be two layers of bias tape to sew through.
  4. Sew from the edge, using the same process in Step 1. 
  5. About 6" from completing the addition of the bias tape to the quilt perimeter, sew the loose end (the 4" long piece from Step 1) to the long piece using a diagonal seam. The diagonal seam will look like the rest of the seam lines in the bias tape.
When closing the bias tape 'loop' - make sure that the length is correct to cover the remainder of the back and not too long. Finish sewing this section. To sew the bias tape to the front of the quilt:
  1. Fold the bias tape around the quilt edge.
  2. Pin the tape in place.
  3. At the corners, fold one edge in. You will have a diagonal fold at the corners.
  4. Sew the top of the bias tape with a seam allowance that is slightly bigger than 1/4", so hide the stitching from the back side.
This approach is pretty straightforward. The most difficult parts are matching and stitching together the two edges. This is easier if you leave a lot of bias tape free on both sides and are careful to join them so the final length just reaches around the quilt perimeter.